Introduction
In this tutorial we will guide you how to delete the system reserved partition which is created during the windows 7 installation.
Here in this procedure it involves deleting the boot partition and then repairing.
Here you have to make sure that C drive is the primary partition before you begin the procedure and you have to type “diskmgmt.msc” in the start menu to access the window.
• Here you have boot from the installation or repair the disc.
• Press Shift+F10 key when you get the language screen.
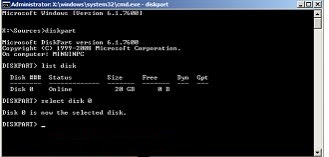
• Now enter diskpart.
• After diskpart is loaded, click “list disk”.


• Enter the option “delete partition override”.
• Now type “Select partition” and hit enter and then type “active” and hit enter.

• Close the command prompt.
That’s it, the partition is deleted and the windows will not boot and you will have to write the new boot loader.
No comments:
Post a Comment